Posts

Showing posts from May, 2019

Understanding Digga excavator hitches

Image
Digga manufacture a range of excavator hitches for machines up to 90 tonne. They were designed and manufactured to improve operator and workers safety when manoeuvring around sites whilst also providing a simpler connection to augers and piles. All our hitches are custom made to your machines requirements and vary in suitability depending on your use. Here are some key advantages of each of our excavator hitches and an explanation on how to submit an order. Digga excavator hitches Choosing from Digga’s range of excavator hitches will vary based on the application and attachment, and your machine. Below are 4 of Digga’s excavator hitches which are fully engineered and manufactured at our Yatala facility in Queensland.  Digga single pin hitch The single-pin hitch is suitable for excavators using smaller drives. It is a light weight, non-bulky option for smaller machines. This hitch can be used to fit Digga PDD to PD3 drive units on micro or mini excavators up to 3 tonne.

Why choose a 2-speed drive over a single speed drive?

Image
If you’re working with multiple sized augers or often in different ground conditions you’ll understand the expense and time wasted that comes with needing multiple drive units for the different applications. When the ground is soft you want a higher speed to get the hole drilled quickly and then move onto the next one. When the ground is hard or you’re using a large auger you need torque to get the job done efficiently. Speed and torque are always a trade-off; when you increase your speed you lose power and when you increase your power, you lose speed. Similar to a manual car, fourth gear allows speed but struggles with the power required to get the vehicle up the hill Standard, single speed drives are typically manufactured as a cost effective solution to provide a speed and torque to suit most applications but will give you one or the other. 2 speed auger drives have grown in popularity over the last few years and, as leading manufacturers, we can understand why. We unde

$87,900 raised for Ovarian Cancer Research

Image
In combined efforts with the very generous earthmoving industry, Digga Australia together with Kanga Loaders, so far were able to raise $87,900 in donations this year to support the Ovarian Cancer Research Foundation, with another charity loader up for auction this month. The Ovarian Cancer Research Foundation was chosen as a partner charity of Digga, a foundation dedicated to developing and implementing an early detection program and improving the mortality rate, management and long-term survival of women with ovarian cancer. As the company suffered a big loss in June 2018, when Suzie Wright, CEO and Managing Director of Digga Australia and Kanga Loaders, passed away after a long struggle with a rare form of ovarian cancer, this is a very close cause to our hearts. As the major sponsor of the Diesel Dirt and Turf Annual Charity Golf Day, which was held on the 15th of March this year, Digga, together with many sponsors and supporters of the industry, was able to raise donation

When and how to service your trencher - Trencher Servicing and Maintenance

Image
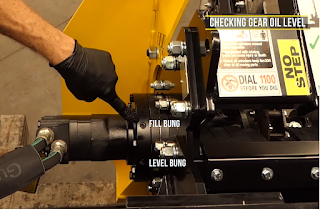
In order to maintain your trencher at its best performance, regular maintenance is required. We recommend the following: Service and oil change 1.     Change the gear oil within the first 30 hours of extreme work, within 50 hours of moderate work or otherwise within the first 3 months. 2.     After the first service, the gear oil must be changed every 300-500 hours 3.     Check your gear box oil level every 10 hours of operation: Locate the level bung at the 2 o’clock position and make sure that the fill bung is centred and the trencher level. Top up your gear oil through the fill bung until the oil can be seen exiting the level oil 4.     Carry out a full service every 12 months by a trained and authorised Digga technician Pre-operational checks 1.     Visually inspect your trencher and components 2.     Check that all nuts and bolts are in place and properly tightened 3.     Check all fittings and hydraulic hoses are tightened and secure 4.     Check that