Posts

Showing posts with the label How to guides

Digga Tips - Which Auger to Choose for What Ground Conditions

Image
When drilling in different ground conditions you need the right speed and the right cutting system on the auger to suit the different ground conditions. So which auger should you choose for your application?For efficient drilling on any machine requires power (torque) and down pressure. Digga augers perform better at an optimal RPM against the ground conditions they are against. Similarly the auger diameter will perform better at certain speeds. For example: the larger the hole and harder the ground conditions, the slower you will need to drill. The smaller the hole and softer the ground conditions, then more speed is required.  As a general rule we recommend the following RPM/speeds: 55-65 RPM for general earth conditions. 45-55 RPM when drilling in heavy earth, clay or shale.  20-45 RPM when drilling in rock. Results will depend on rock hardness, type of auger being used and machine down force.  Digga recommends the following for attachments for the different ground c...

Digga tips: drilling in clay

Image
When you’re drilling in clay it can be difficult to remove the spoil off of the auger. It’s tempting to alternate the drive from forward to reverse to flick the clay off, but this can cause serious torque related stress on the drive gearbox which will lead to premature failure and subsequently expensive repairs. Hitting the auger against the ground can also create side load on the shaft which could in turn damage the shaft seal and gear box. In our previous blog post we explain the best way to remove spoil from your auger; using a forward, stop, forward, stop control pattern. This can often take a long time when working in clay and time costs money… Here are a number of tips to help remove the spoil from your auger when drilling in clay: Drilling another hole with the clogged auger and then reversing out of the hole will remove soil from the flights Using a single carry flight auger to avoid the clay becoming compacted between the flights Choose a steep pitched auger flig...

The Digga ECV and pile kick back when installing screw piles.

Image
Screw piles or helical piles are installed to an engineered torque specification. By the time installation torque is reached and the operator stops the machine, the screw pile has built up rotational energy - similar to a rubber band on a wind up model aeroplane. This energy that is stored in the anchor needs to be released before the drive unit is disconnected. The ECV bypasses the stored energy allowing the anchor to “unwind” in a controlled manner. Without this valve, the pressure contained when holding the pile in place would be forced up the pile and into the drive unit resulting in potential damage & costly repairs for the motor and gearbox. See the diagram below, the red arrow demonstrates the force of the energy up the screw pile. Digga's flow reversal bypass valve (Energy Control Valve - ECV) is fitted as standard to Digga Screw Anchor Drives and can be retro fitted to drilling drives as required. The Digga ECV effectively protects the motor in your dr...

Digga tips - when to rotate picks and change the teeth in your rock auger.

Image
You will at some point need to replace your auger teeth , when is dependent on how often they are used, how they are looked after and the ground conditions they are being used. However, the teeth on your auger should be changed as soon as reasonable wear is noticed and before any pocket wear occurs. The productivity of the auger will decrease as the efficiency of the teeth wears. The outside teeth are travelling the greatest distance as they follow the rotation of the circumference of the augers diameter so they will wear out much quicker than those towards the centre. This is because they have not been travelling as greater distance. The most common sign of wear is to the outer tips of the tooth and this wear will follow the radius of the diameter. If you continue to wear through your outer teeth, you will begin to wear into the pockets and the flights of the auger. It is important to check your teeth regularly to work productively and efficiently. If you find yourself in a r...

Digga tips - the importance of vertical alignment when drilling.

Image
Having trouble drilling? The correct vertical alignment of your auger into the ground is essential to ensure efficient & effective drilling with your excavator. The natural arc movement of the boom causes the dipper arm to move out of alignment as it is raised or lowered, which is why constant operator adjustments are required to maintain vertical alignment. Please consider, that failure to do so will create significant side load on the auger drive and auger! As Digga auger drives are pendulum drills designed to hang freely from the excavator mount - excessive side load may result in bent auger flights, pipe and hubs as well as potential damage to the auger drive shaft, seals and gearbox. When you are drilling especially into hard ground this may also  cause socket and pilot breakage. So make sure to align your auger and drive correctly, to avoid damager and drill which much better performance. You can find more info and tips for drilling in harder grounds such as rock or...

Digga tips - best practice when drilling in rock.

Image
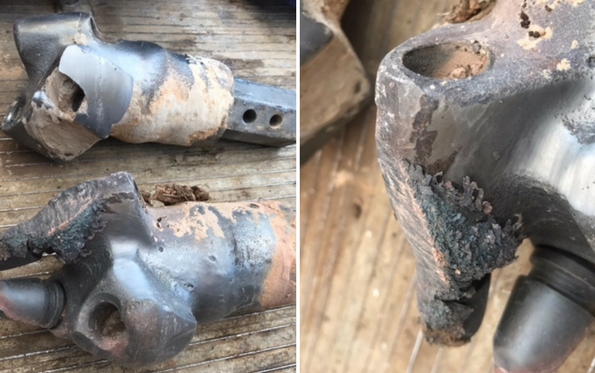
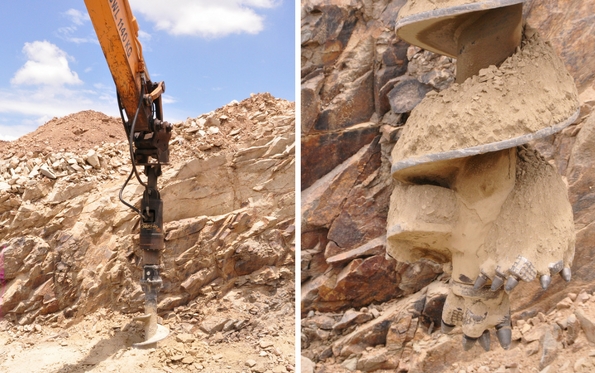
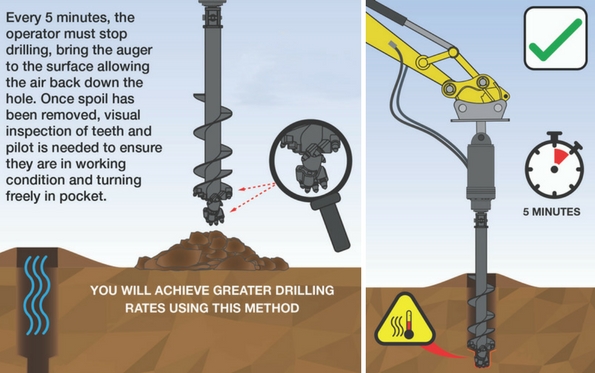
Are you having trouble drilling in hard rock? We can help you out with some tips to make your job easier.. and more efficient! Without damaging your drillhead or wearparts. Let us explain why rock drilling may cause difficulties and issues when not carried our correctly: When drilling rock or frost for extended periods of time, air is trapped in the hole creating an oven effect. The trapped temperature and friction causes the wearparts and pilot to heat up to an extreme temperature, causing them to melt. It will damage the drilling head and can result in the face of the rock to 'glaze over' and become an even harder surface. This is why we recommend that you periodically remove the auger from the hole to allow fresh air back in the hole every 5 minutes. This means - stop drilling and bring the auger head to the surface to allow air into the hole. Below is an example of an auger, which was left down the hole for too long. While it may seem excessive to have to bring ...

Trencher wearparts

Keeping on top of your wear parts and prolonging their life will keep you working efficiently for longer. In this video Anthony Wieckmann, Digga Sales Manager, explains how to tell if your teeth are worn and when you need to change them.

Maintenance for you Digga drive unit

Digga drilling drives. Digga's range of premium drilling auger drives are the ultimate is performance, quality and cost effectiveness.  Ideally suited to drilling and auguring applications in most ground conditions, the Digga drive range is completely manufactured and assembled by Digga in Yatala, Queensland. Maintenance for your Digga drive unit. In this video, Mark talks you through the maintenance checks you can make to your Digga drive unit. Before each use you should check the following: Make sure all nuts and bolts are in place and secured tightly Make sure all other fasteners are in place and secured  Check all hydraulic connections are tight and that there are no leaks  Ensure all your safety signs are in place and visible  Check externally for oil leaks  Check the pins, bushes and linkages for wear and tear If you need to make any repairs or maintenance to your drive unit please refer to your user manual for guidance or contact your ...

Digga tips - best practice to increase the life of your wearparts.

Image
The cutting teeth & pilot on any auger are wear parts and you can increase the life of them with the help of Digga's best practice tips. The wear life of a tooth or pilot is undefinable. They will be affected by how often they are used, how they are looked after and the ground conditions they are being used in. For example, in non-fracturable ground where the rock is reduced to a powder; the powder is likely to get caught in and around the cutting head and, acting like a sand paper, will wear away both the pocket and the tooth. In hard ground conditions such as rock over heating within the hole can cause the ground to glaze over. The heat will polish the rock making it harder and have a greater influence on the wear of your cutting heads. To assist with peak performance and longevity of the wear parts there are a few procedures that can be carried out that will help prolong the life of wear parts and increase drilling efficiency. To help increase the life of your wear...

Digga tips - best practice for removing spoil from your auger.

Image
The best way to remove spoil from your auger is to use a forward, stop, forward, stop control pattern until all the spoil is totally removed. When you have been drilling with your auger it may seem like a good idea to alternate the drive from forward to reverse to clear the auger of spoil once lifted out of the hole but, it can cause torque related stress on the drive gearbox which will lead to premature failure. If you have one of our 2-speed drive units try using the high-speed mode to flick the spoil off the auger. When you are drilling in clay you could also try wetting the auger or spray some watered down detergent on the flights before drilling. This will help the clay slide off of the unit.  For more information on the Digga drive range check out the following blog posts:  Digga tips - best practice to increase the life of your wear parts Digga tips - when to rotate picks and change the teeth in your auger Maintenance for your Digga auger drive ...